All products featured are independently chosen by us. However, SoundGuys may receive a commission on orders placed through its retail links. See our ethics statement.
How to read a polar pattern chart
December 5, 2024
If you’ve ever read specifications or reviews on microphones, you’ve probably stumbled across a polar pattern before. Together with frequency response, they define a microphone’s most important characteristics. These polar charts are meant to show you how the microphone responds to the sound around it, and in this article, we’re going to help you interpret them. Be sure to watch the video above if you simply want to know where to place your microphone once you understand its polar pattern.
Editor’s note: this article was updated on December 5th, 2024, to clarify technical information and add a table of contents menu
What is a polar pattern chart?
Microphones will detect sound from different directions, but not every microphone functions the same way. Some microphones can capture sound from almost every direction, while others require your subject to be directly in front, on-axis. When microphone manufacturers describe the directionality of their microphones, they’re talking about where your subject needs to be in relation to the microphone in order to be picked up properly. To better explain this, manufacturers will include what’s called a “polar pattern” on the box, or in the documentation, to show users what the pickup pattern is like—but the axes and traces aren’t often explained.
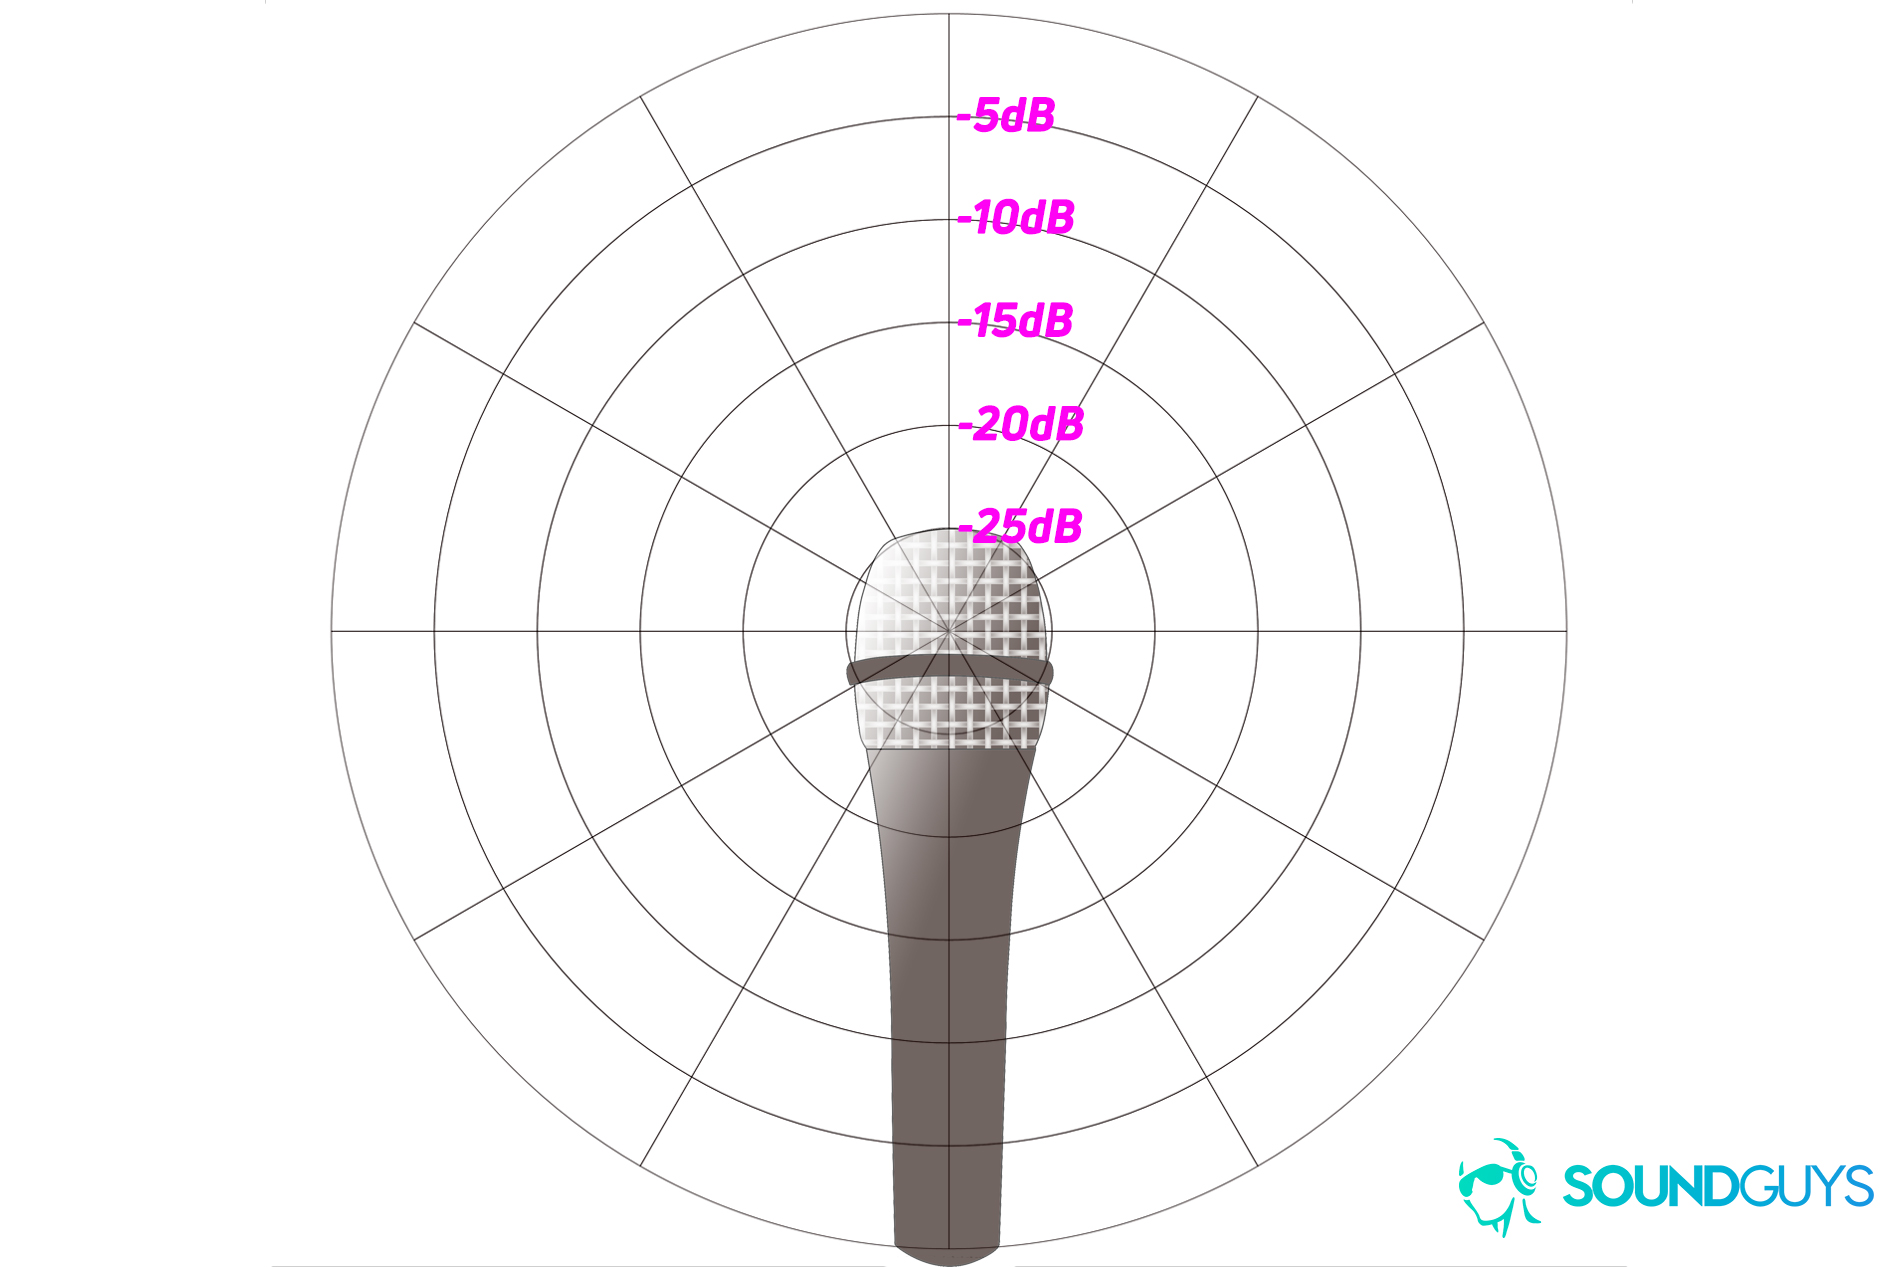
In all the charts below, imagine the microphone’s diaphragm element is right on that horizontal line, with the front-facing the top of the circle, and the back facing the bottom of the circle. Each line extending from the microphone to the outer edge of the chart represents a 30-degree angle away from “on-axis” (0-degree deviation) sounds. Each circle expanding out from the center represents a different threshold, usually in 5dB increments, of the microphone’s sensitivity to incoming sounds. Polar patterns provided by manufacturers won’t have that photo of the microphone on it, so when you see it in the charts we have here it’s mainly just so you don’t get lost.
Essentially, the blue line illustrates where the microphone will pick up the signal optimally. But what do all those confusing terms about pickup patterns mean? Let’s take a look!
What is an Omnidirectional polar pattern?
This type of microphone picks up sound from all directions simultaneously. You’ll likely encounter this pickup pattern if you’re shopping for a lavalier mic for interviews or on-camera work. It’s commonly found in all-in-one wireless microphone systems that YouTubers love to use, like the DJI Mic 2 and Rode Wireless Pro.
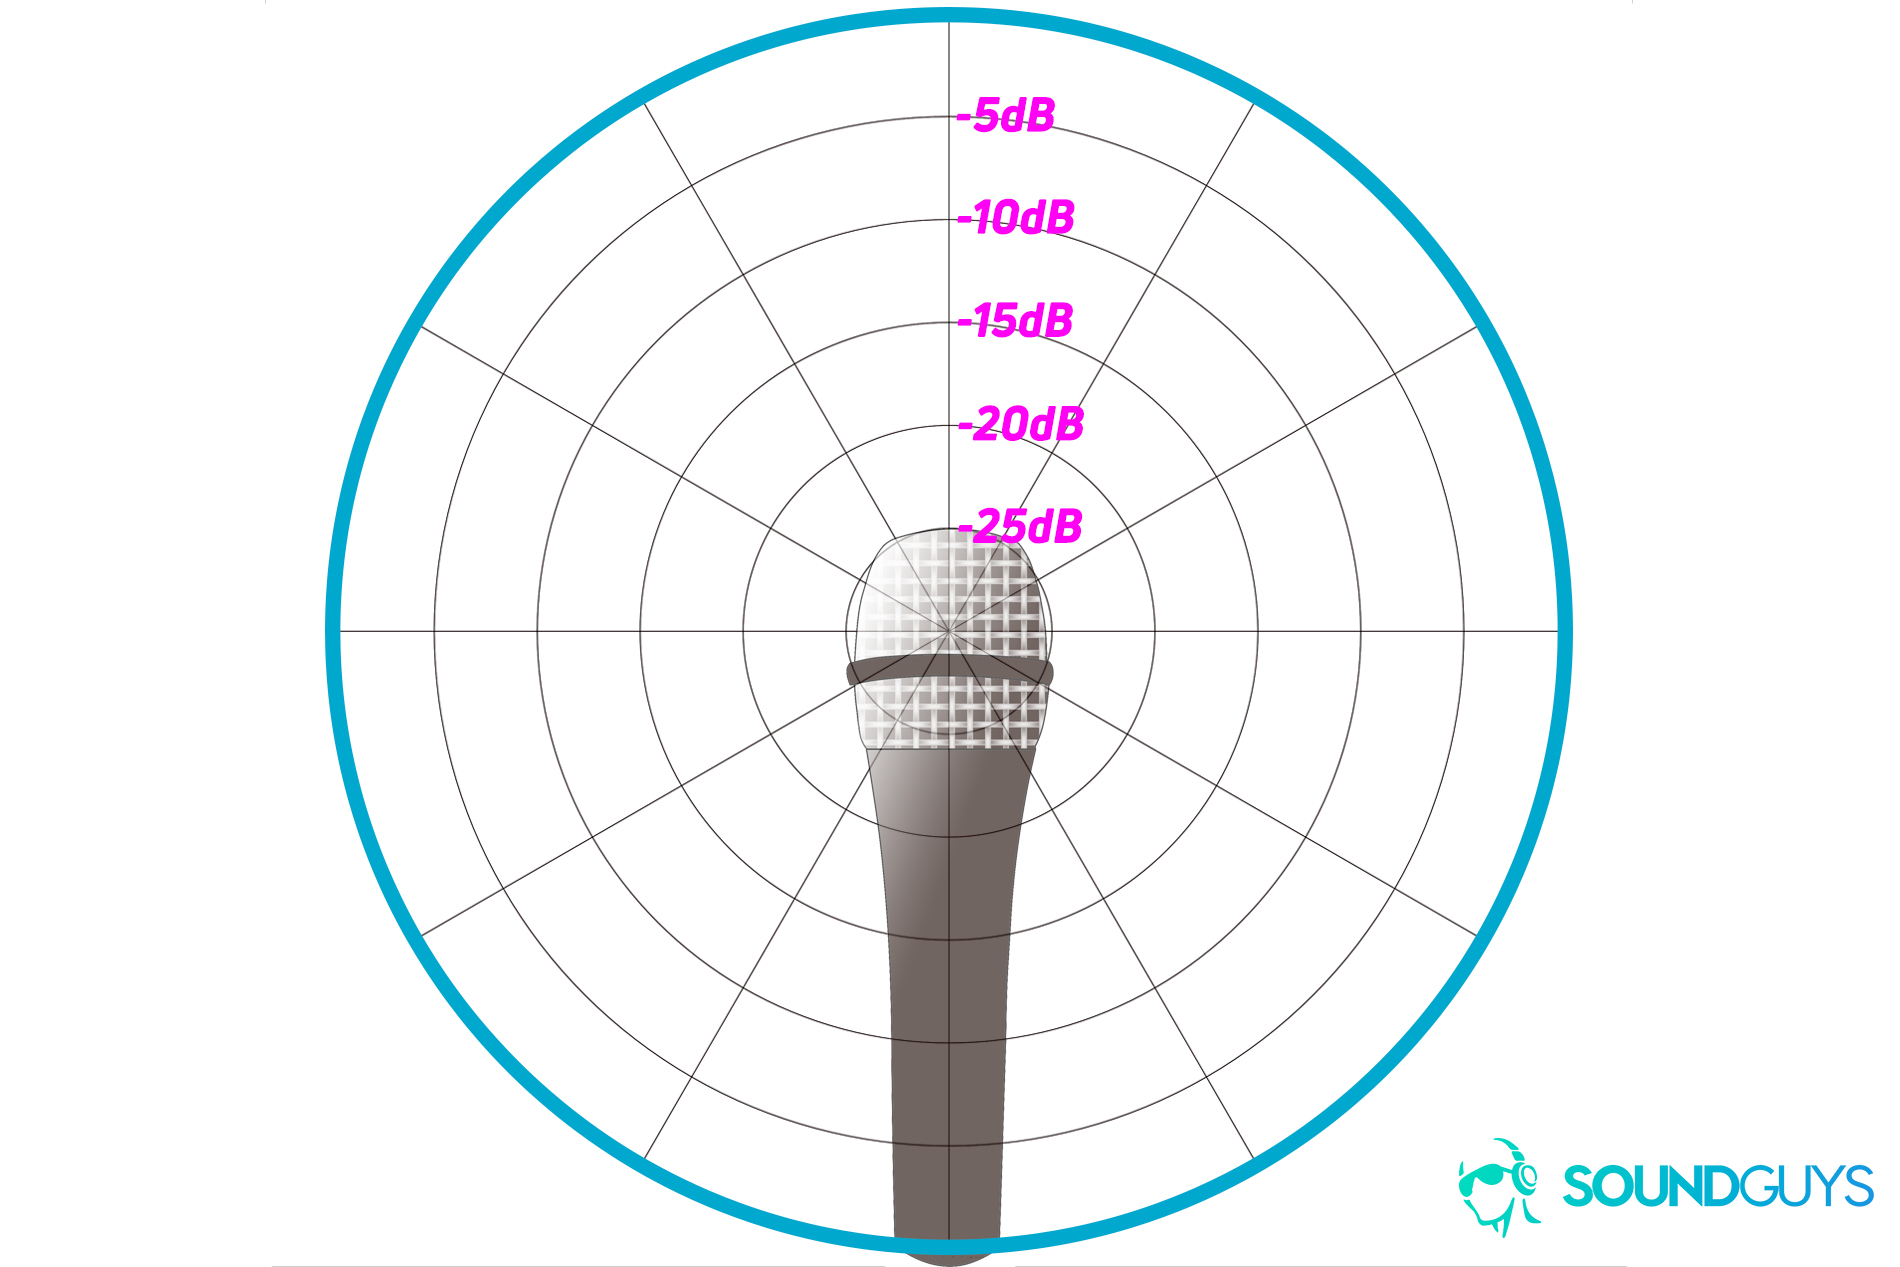
While these mics are great for capturing a room’s ambiance, it’s not so great if you’re recording in a noisy environment, need to isolate a person speaking, or pick out a singular musical instrument among many. This is why many of the previously mentioned all-in-one systems offer a noise canceling feature.
What is a Cardioid polar pattern?
If you studied Latin in high school, you’d know that all “cardioid” means is “heart-shaped.” That describes the basic shape of this type of microphone’s pickup pattern.
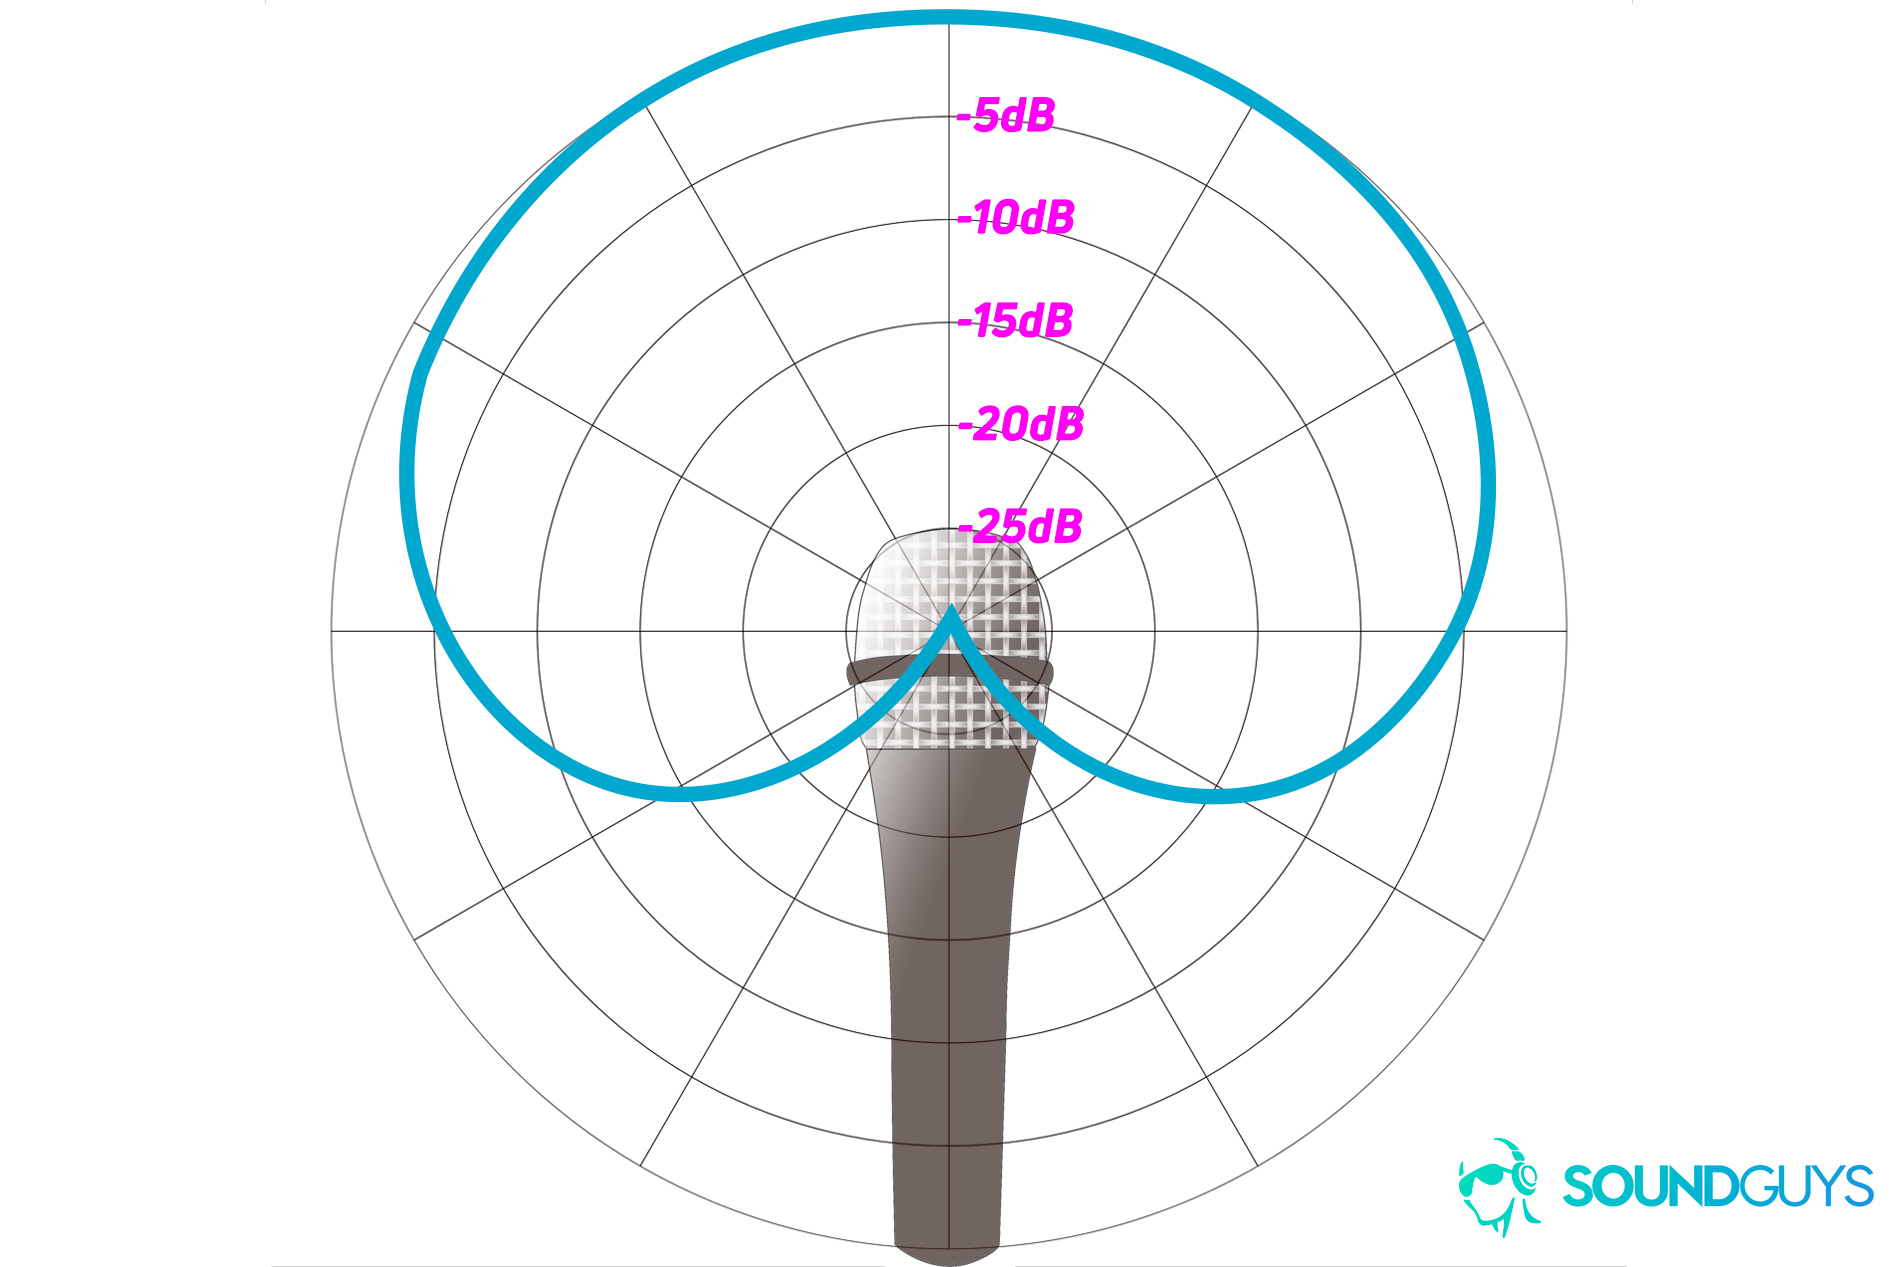
This type of microphone is good at capturing a sound that’s generally in front of the recording element, but it can be at an off-angle and still be fine. This is one of the most common pickup patterns, often used in consumer microphones, as it is very forgiving on the user for its placement while also preventing unwanted sounds from behind the mic from showing up in your recordings.
Some examples of microphones that rely on a cardioid pickup pattern include the Shure SM7dB and Shure MV7+, which are popular with podcasters and content creators, and home studio microphones like the Rode NT-1A.
What is a Hypercardioid, or Unidirectional polar pattern?
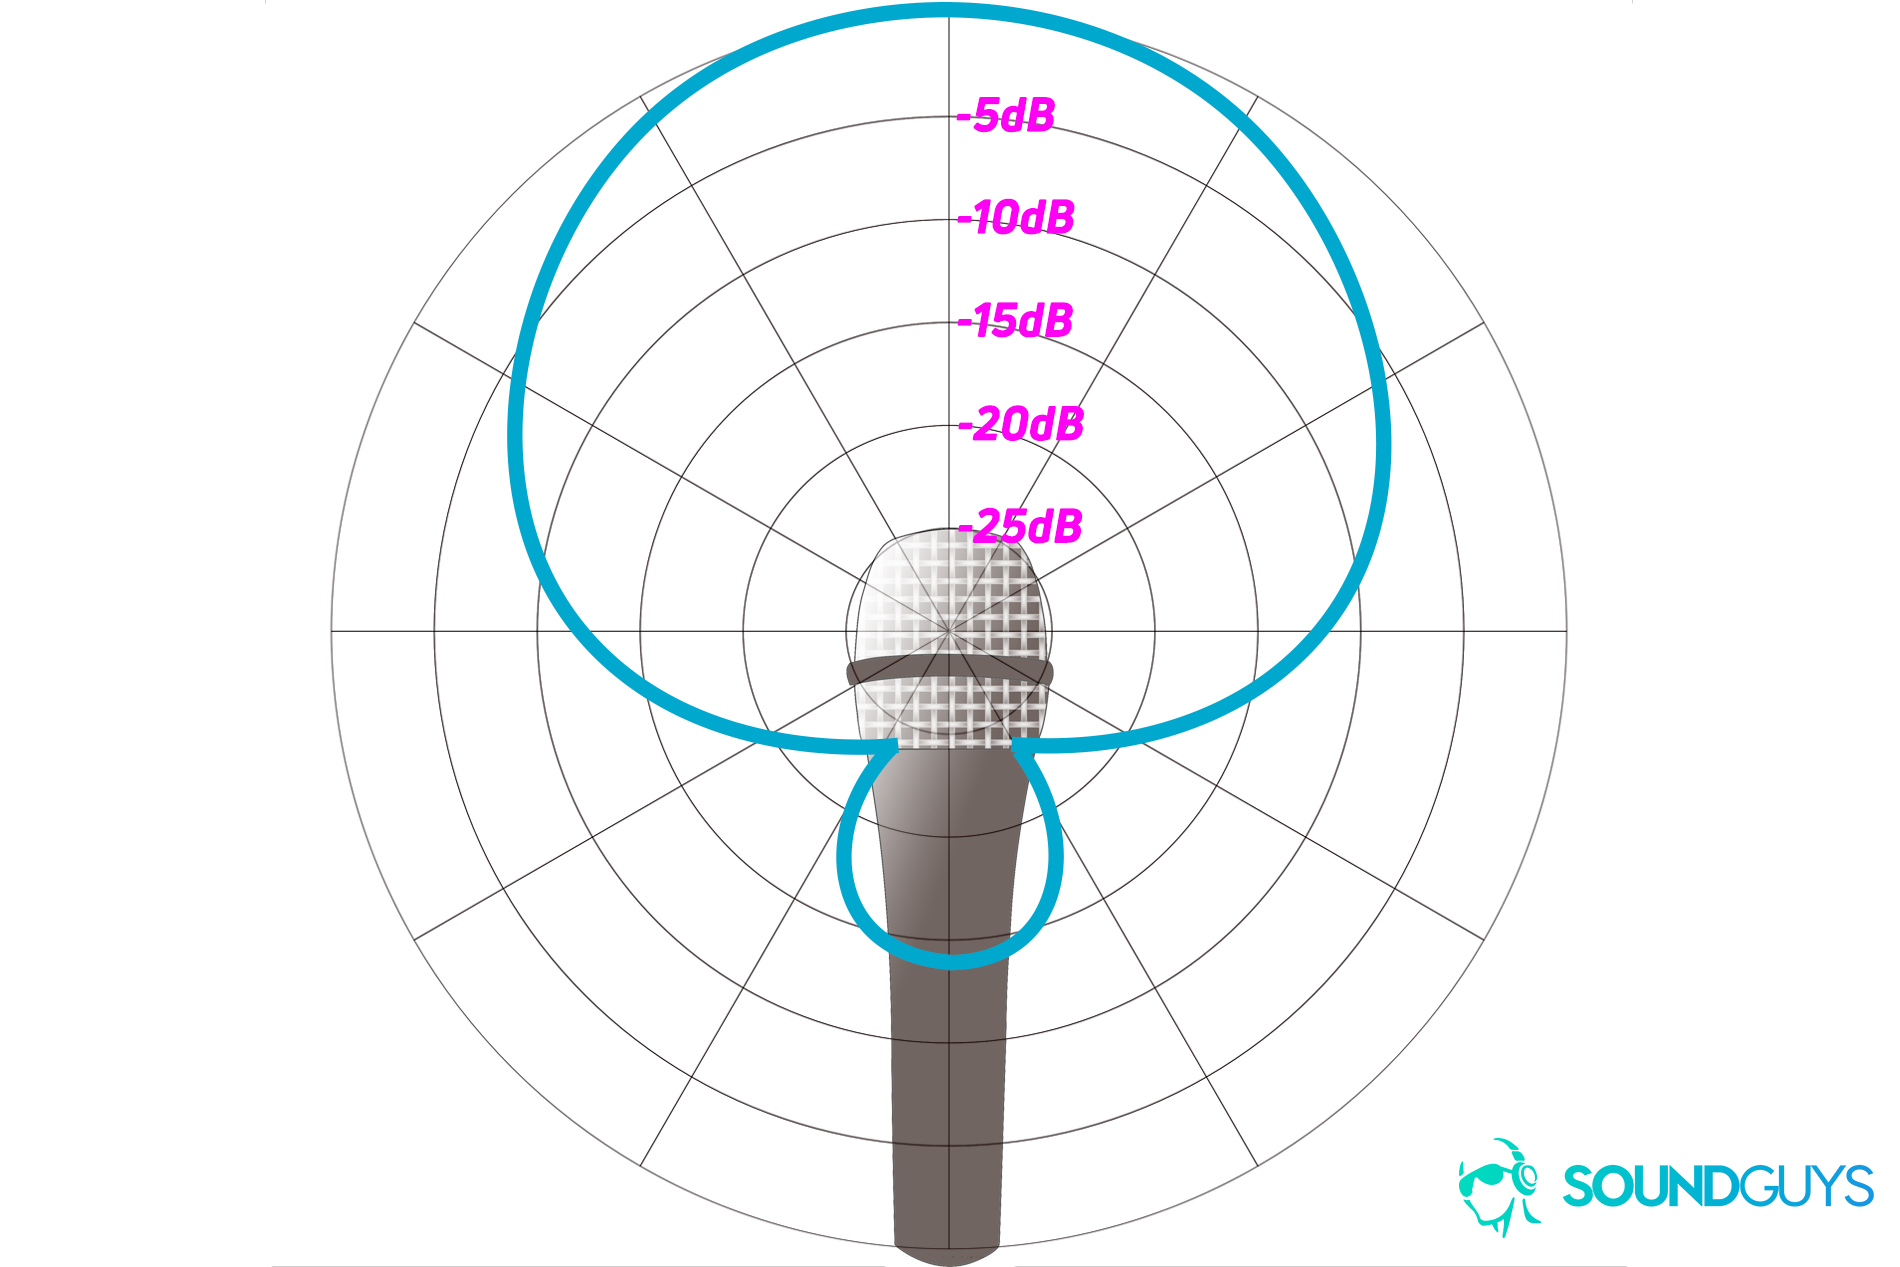
A hypercardioid mic has a tighter pickup angle and offers more side-rejection than a cardioid pattern. It is, however, slightly sensitive to sound sources that are directly behind the mic. A hypercardioid recording pattern provides better isolation from room noise and nearby instruments and can offer better feedback resistance than a cardioid mic, but you need to maintain a more consistent position directly in front of the mic. This type is exceptionally useful for recording specific instruments like drums, and recording on-camera audio (in what are called “shotgun” mics).
What is a Supercardioid polar pattern?
This kind of pattern is very similar to that of a hypercardioid but slightly different. Technically, hyper-cardioid microphones have an angle of maximum rejection at 109.5 degrees, whereas the super-cardioid microphone has an angle of maximum rejection at 125.3 degrees. If you’re having a tough time deciding between a hypercardioid and supercardioid microphone, you can’t really go wrong with either as a highly directional mic, as they are both great at isolating a subject at a distance.
What is a Bidirectional polar pattern?
Also known as a “figure 8,” this pattern can pick up sounds from both the front and back of the microphone. This type of microphone is less common and has limited applications. Sounds coming from directly in front of and directly behind the microphone will be picked up easily by this type of unit.
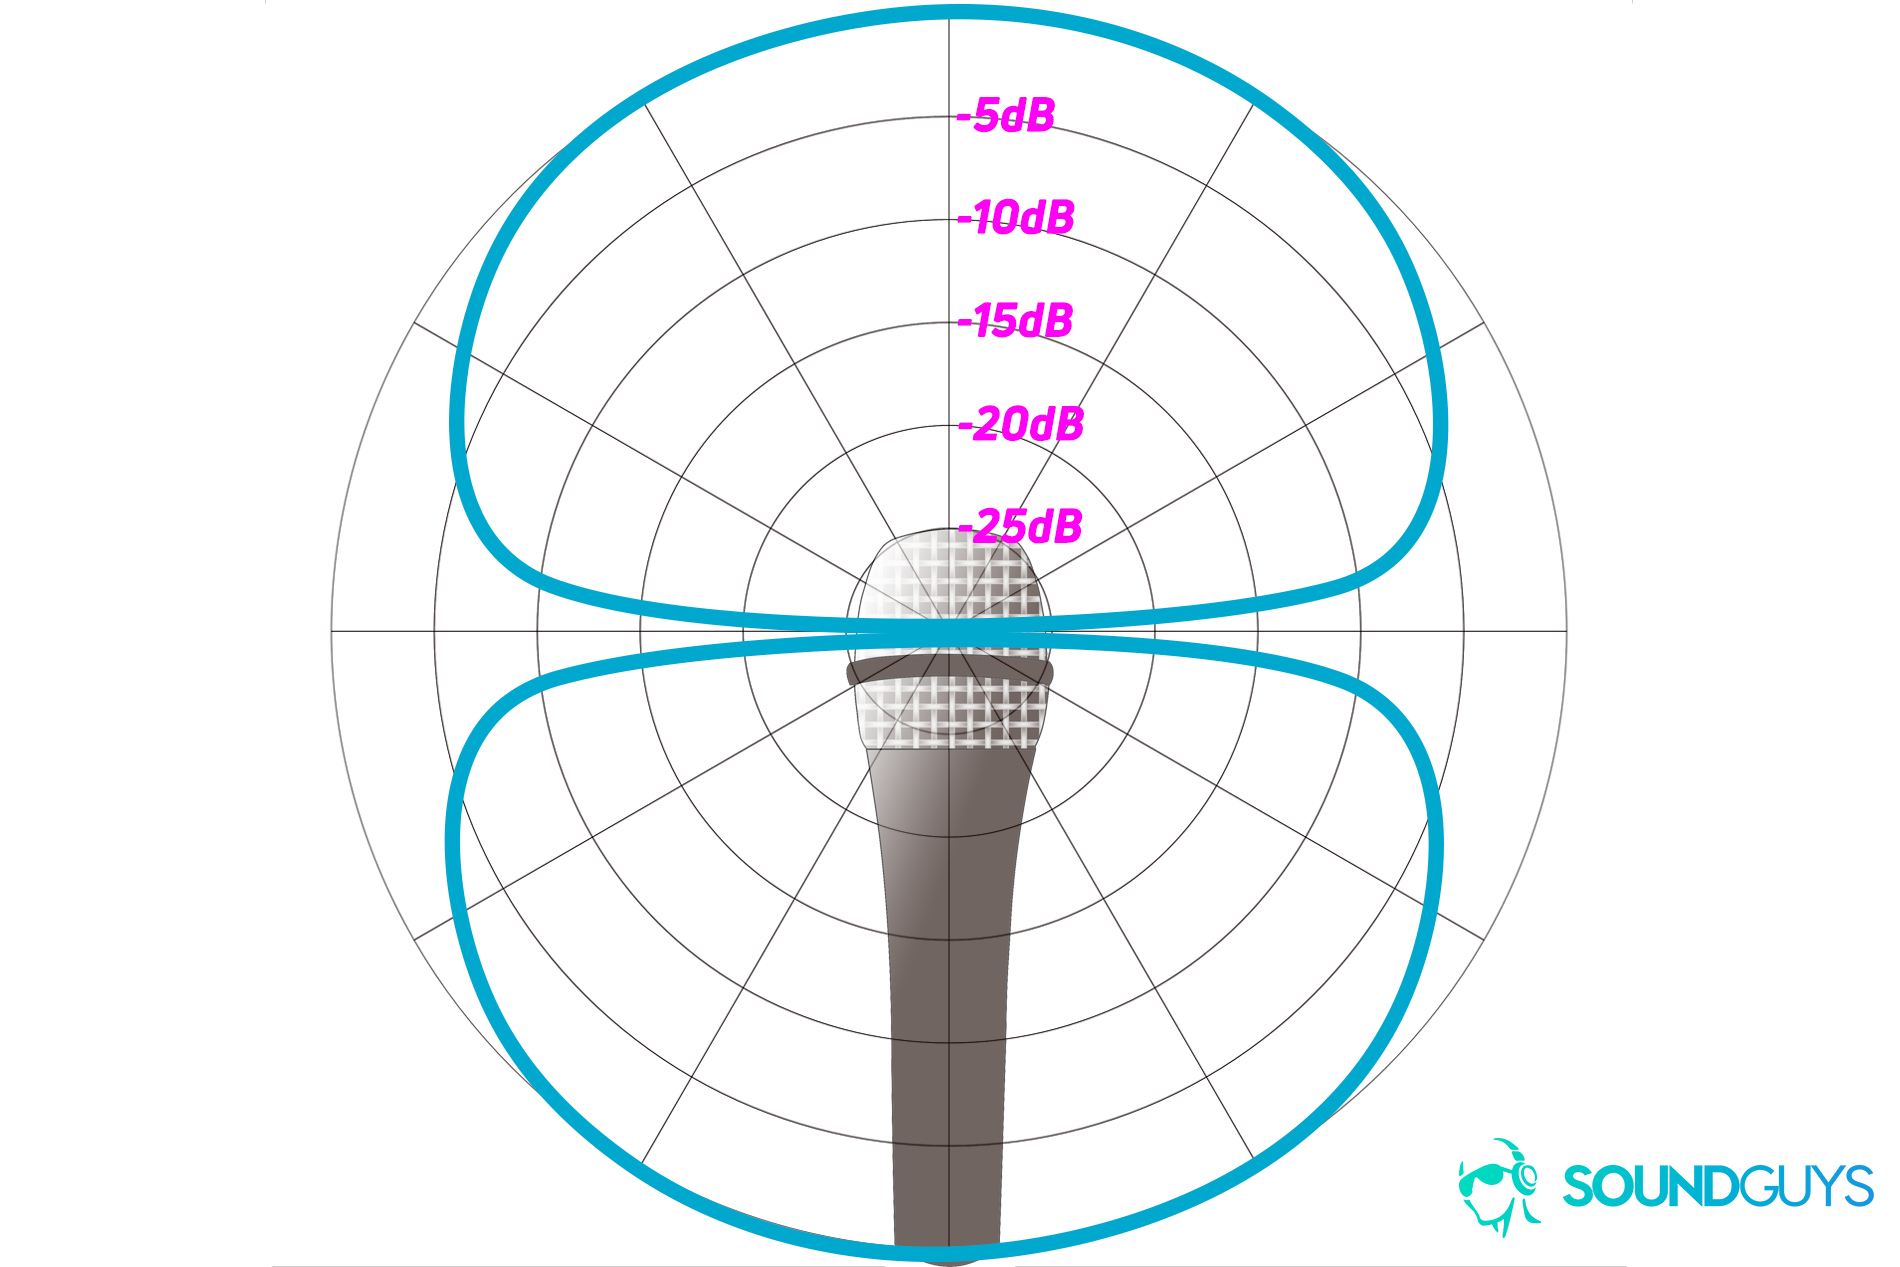
Typically, these microphones will look nothing like the microphone illustration in our diagram, but more like our old standby the Blue Yeti X. You will need to angle the microphone straight up, or upside-down so that the diaphragm is facing your subject, rather than merely pointing the protective grill at whatever you want to record.
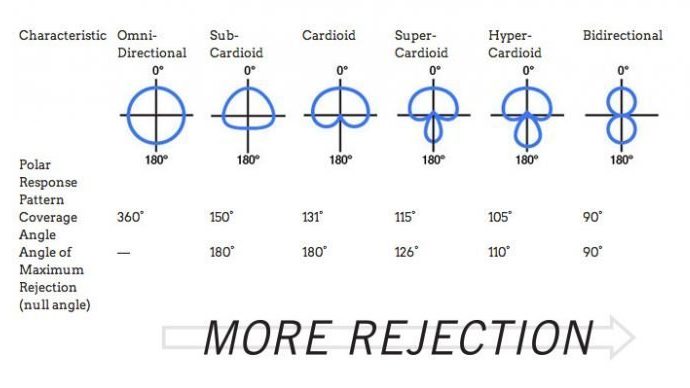
Of course, the above patterns aren’t the only ones; they are just the most common. Manufacturers like Shure (shown above) often run down the differences between each on their promotional material to help you determine which mic you might need. Some tasks require more rejection than others, and you’ll often find that highly specialized mics will have one of the more uncommon pickup patterns to serve their intended use case.
It’s actually a bit more complicated
So far, we’ve considered how a general polar response applies to each microphone, but it’s not that straightforward. The polar response actually changes with frequency. To more accurately describe any given microphone, multiple polar plots are required to illustrate how it behaves at specific frequencies.
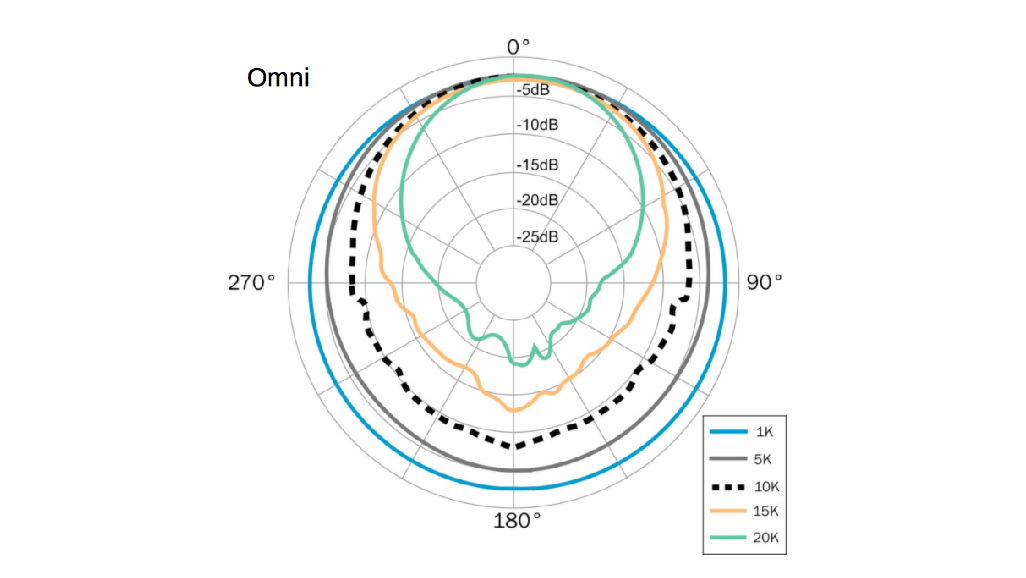
In the above more comprehensive polar pattern chart, we can see that what’s referred to generically as an omnidirectional microphone can actually become quite directional at higher frequencies.
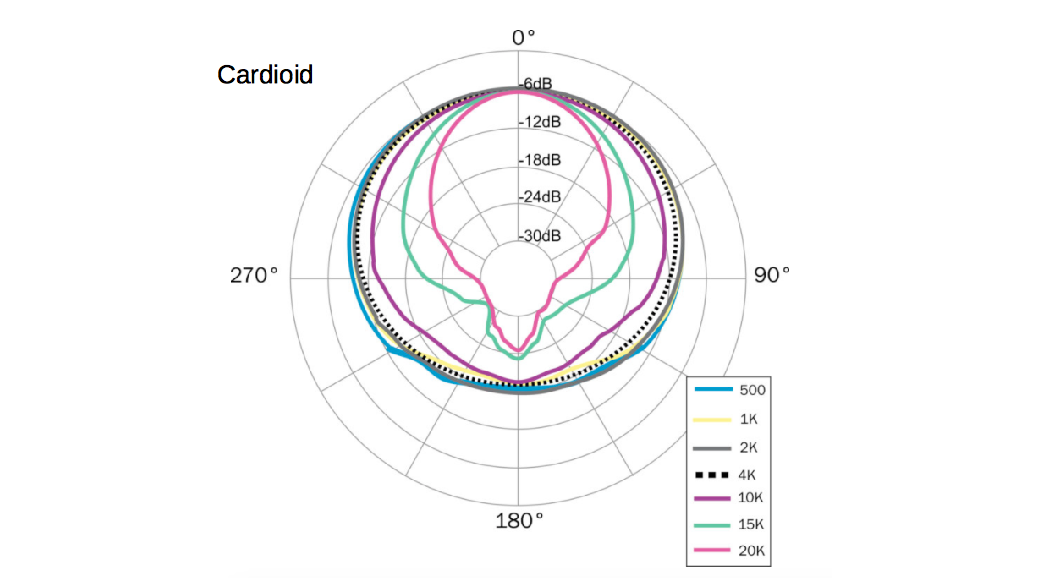
In this more comprehensive polar pattern chart, we see that the cardioid pattern isn’t consistent across frequencies: at low frequencies, it’s closer to omnidirectional, getting more directional as frequencies increase. This information is worth keeping in mind, depending on your use case. For example, this may not be an issue for you if you’re recording a voice, but an instrument? It’s worth thinking about before you buy.
As we’ve seen, a microphone’s polar pattern can tell you a lot: which microphone to pick for a particular job, and how best to place and angle that mic to use its directional characteristics.
Thank you for being part of our community. Read our Comment Policy before posting.